
In this article, we will show you how to start receiving cryptocurrency as payment on your WordPress site using the Bcon cryptocurrency payment gateway plugin for WooCommerce. The advantage of our gateway lies in its non-custodial nature, meaning that you will receive online payments directly into your crypto wallet. In other words, the money goes directly to you, not to the service’s accounts. This allows you to accept cryptocurrency securely without transferring custody to a third party. (Read our other article for more information.)
Let us explain how our extension works in general. To use our WooCommerce extension in your WooCommerce store, you need to create an account on www.bcon.global, where you must link the wallet address to which you want to receive payments. Bcon only tracks payments to your addresses and notifies your website about the payment status. The invoices generated for your users will indicate the wallets that you specify in your Bcon personal account. The system automatically calculates the price in BTC, Ethereum, or Stablecoins based on real-time exchange rates to display the correct crypto amount in the invoice. After installation, the plugin itself will provide you with a callback address that you must specify in the store created on the side of our payment gateway. This way, we will send payment notifications through the API, and the plugin will change the status of your orders.
Advantages of our payment extension:
- You receive money directly to your crypto wallet.
- The plugin adapts to the design of your page.
- Checkout takes place on your website. The payment page is generated by the plugin, and the user remains on your website. There are no redirects to third-party resources.
- You can select specific and custom statuses for orders and define the preferred payment method inside WooCommerce.
- Choose currencies and blockchains for acceptance directly in the WooCommerce plugin for your store.
- No JavaScript checkout.
- Extensive display settings, including the ability to disable branding and change button names.
- Accept cryptocurrency payments and accept bitcoin payments on several chains: BTC, ETH (ethereum), BNB, SOL, TRX.
- Supported stablecoins: USDT, USDC, USDS, TUSD.
If you don’t like reading, you can watch the video.
Step 1. Download the WordPress plugin
Begin by downloading the WordPress plugin from our website. You can find the download link here or navigate manually to the section ( “Integrations – Plugins for eCommerce – WordPress” ).
Step 2. Plugin Installation on wordpress website
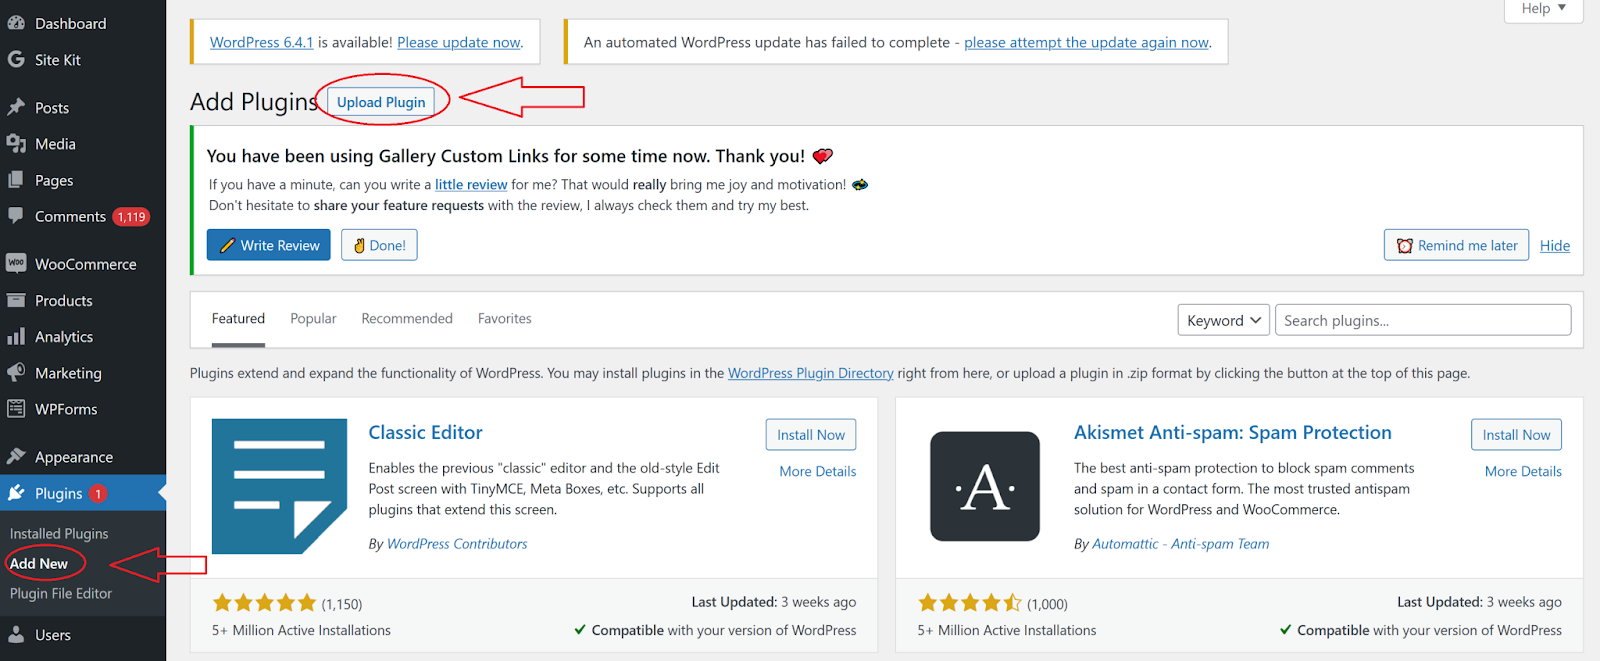
Navigate to the ‘Plugins => Add New’ section in your admin panel. Upload the downloaded .zip archive (do not unzip it) using the ‘Upload plugin’ button, and then proceed to ‘Install’.
If everything is going smoothly, you should encounter something similar to the following.
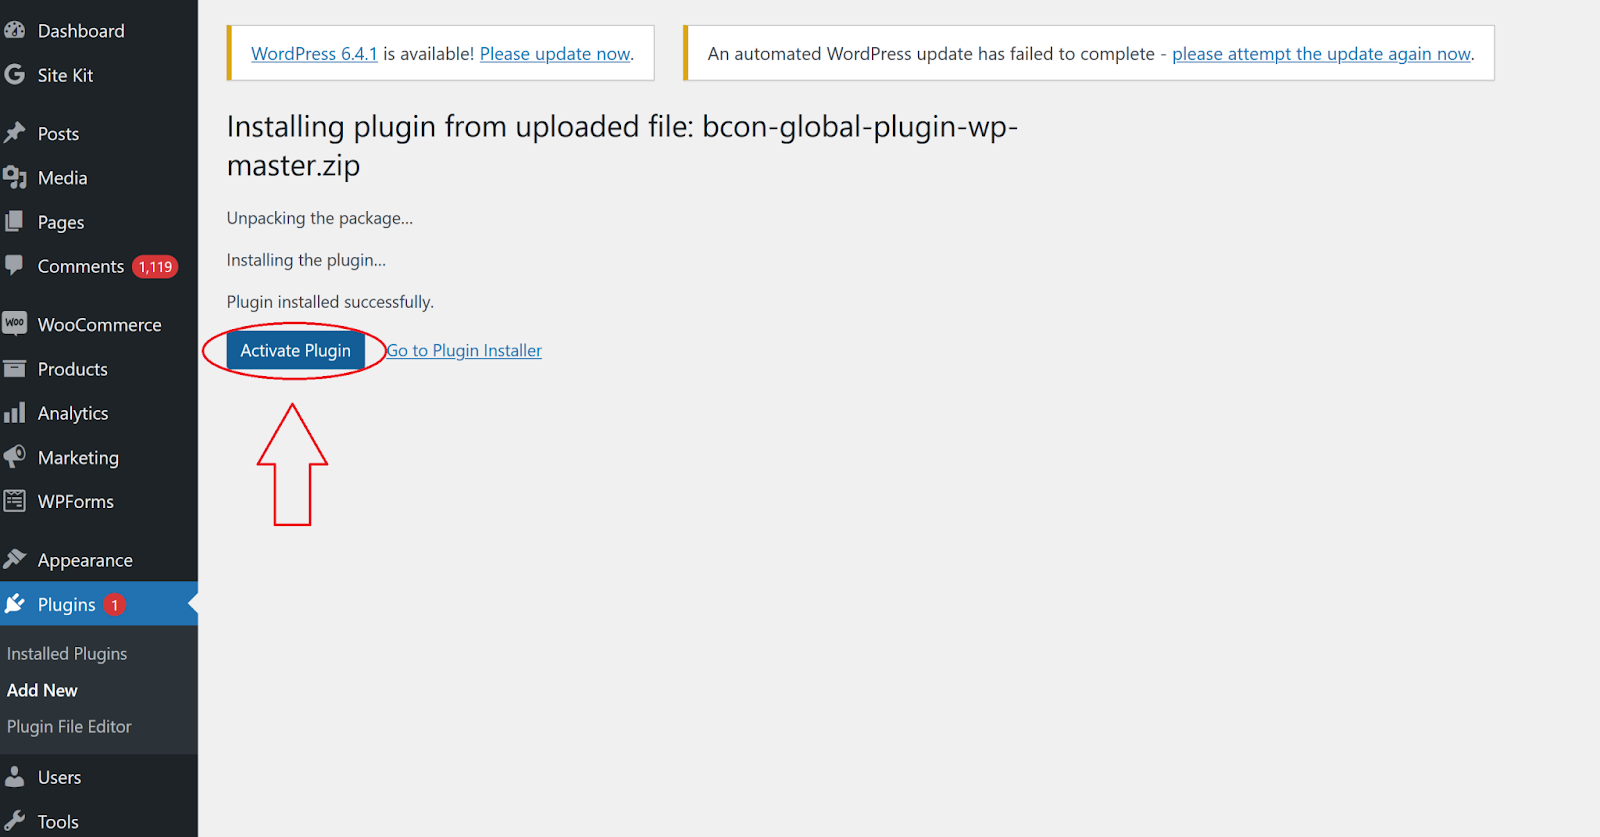
If successful, click ‘Activate plugin.’ Once you click the button, you will be redirected to the list of installed plugins. Search the plugin in this list, and let’s begin configuring it.
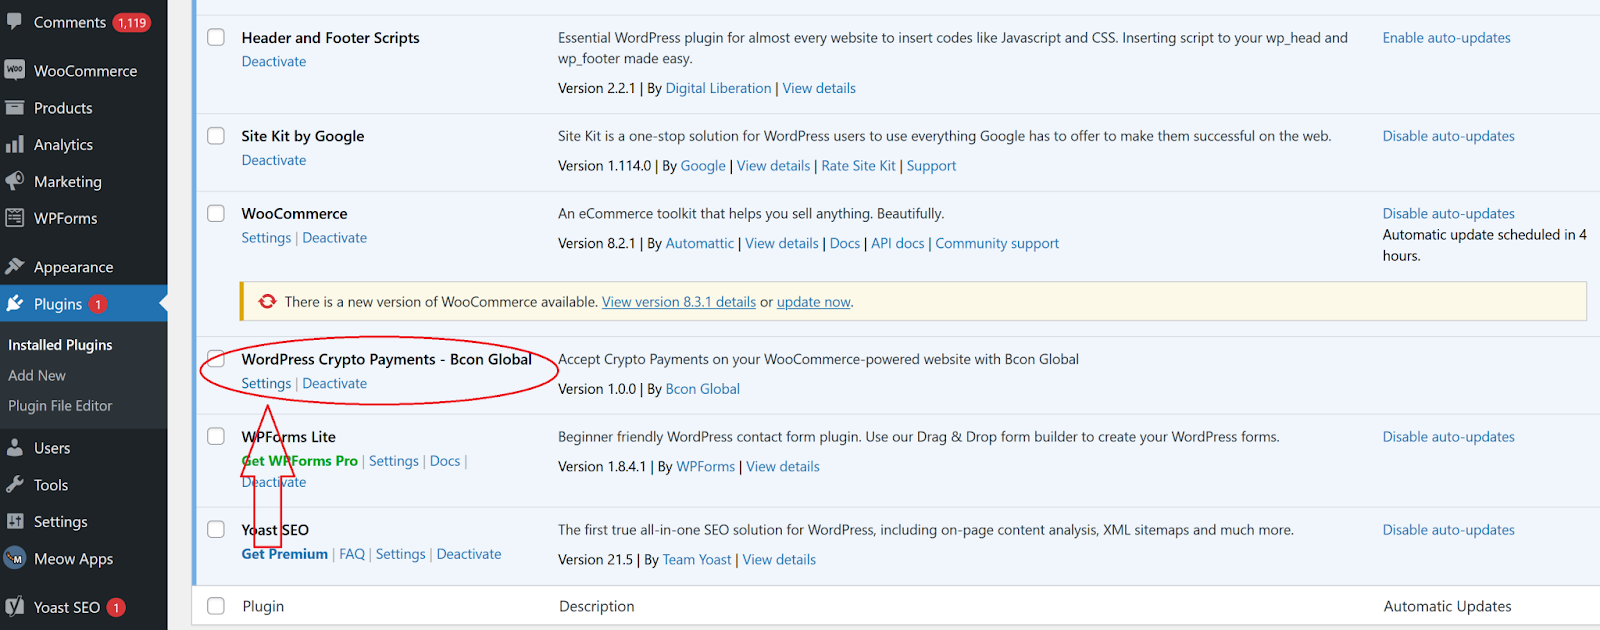
Enter information about your linked Bcon Global store from the next step.
Step 3. Connecting ( Creating) your store in the Bcon Global
Create a “Store” in your Bcon account and then copy the “API key” and “callback link” to fill in the corresponding fields within the settings of the WordPress plugin.
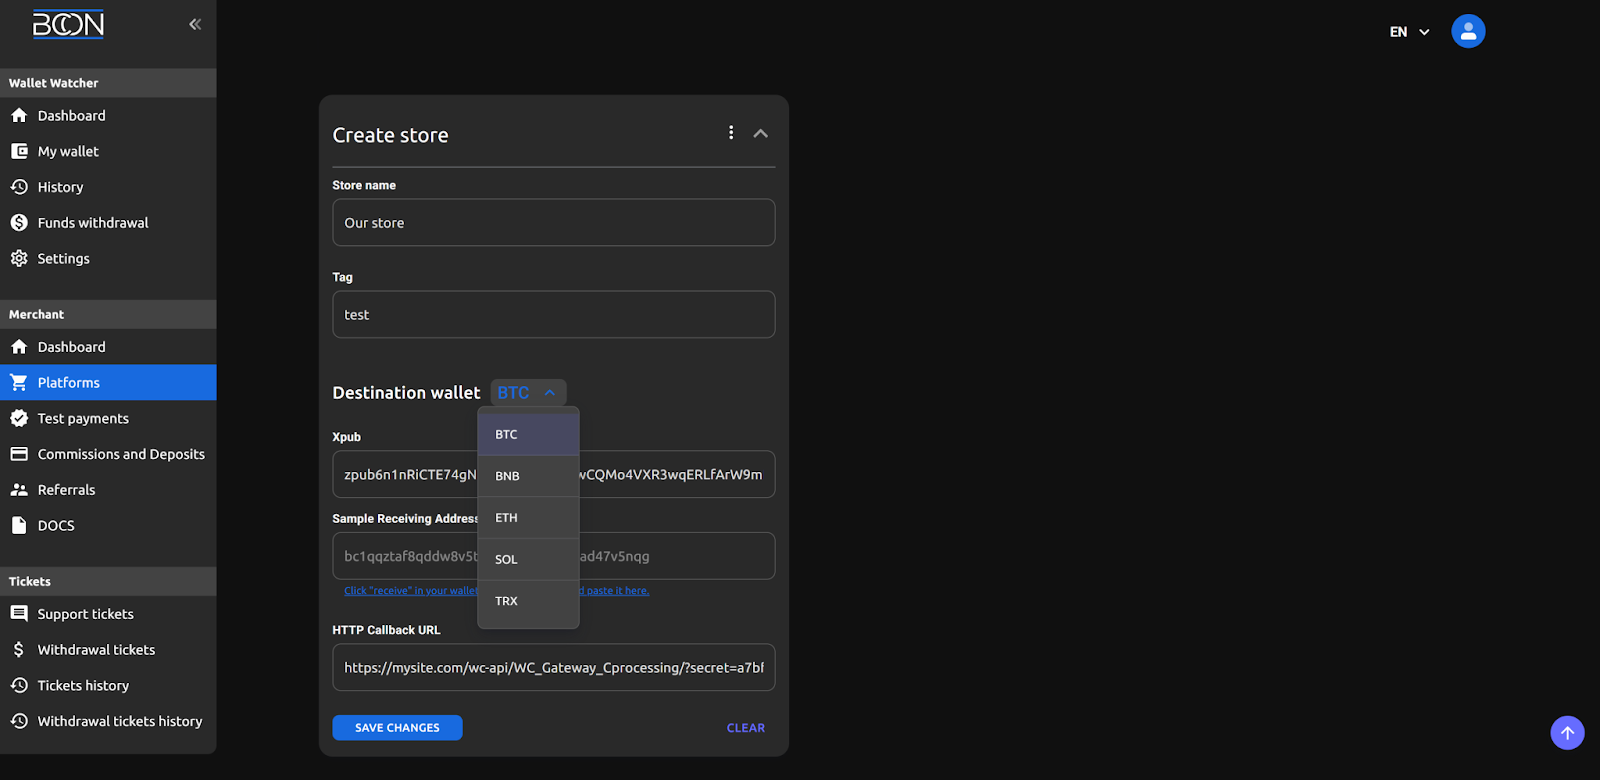
Store Name: This will be displayed in the “Payment History”, allowing you to identify the site for which the transaction was conducted.
Tag: Additional information or notes, at your discretion.
Blockchain Dropdown List: In each dropdown, you need to input your wallet details to receive cryptocurrency from your clients. It’s not necessary to fill out all blockchain pages. If you only want to accept BTC, fill in the details for the BTC wallet and leave other sections empty. For BTC, provide the public key along with one of the wallets generated by this key to verify the accuracy of the entered public key. For BNB, ETH, SOL, TRX , simply specify your wallet address.
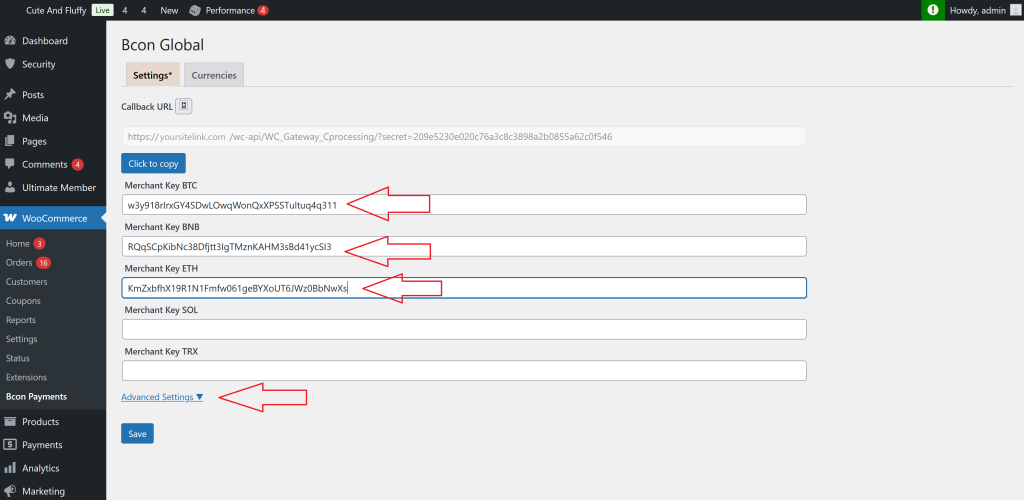
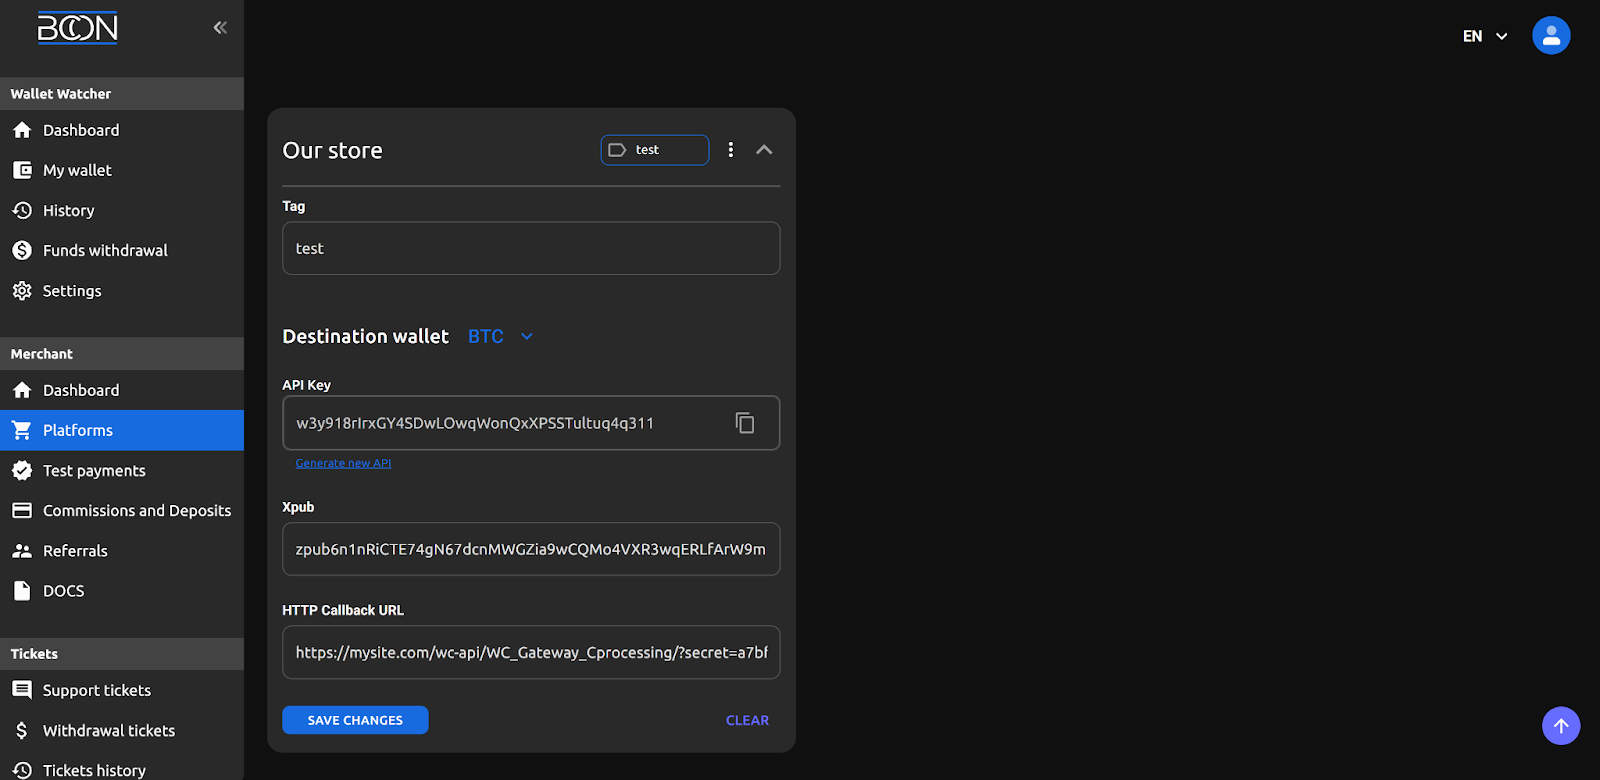
API Key: As shown in the screenshot above, API keys are not issued during Store creation. Therefore, you must initially create a Store by linking wallets. Afterward, revisit it and copy the API keys.
Callback URL: Retrieve this from the ‘Notification URL’ the link supplied by the plugin.
Switch the plugin status to ‘Enabled’. Input the API keys (copy them from the established Store) corresponding to the currencies you intend to utilize. Next, follow the steps to integrate USDC payments to ensure a seamless transaction experience for your customers. It’s important to verify that all settings are accurate and that the payment gateway is correctly configured. Finally, conduct a test transaction to confirm that the integration functions as expected.
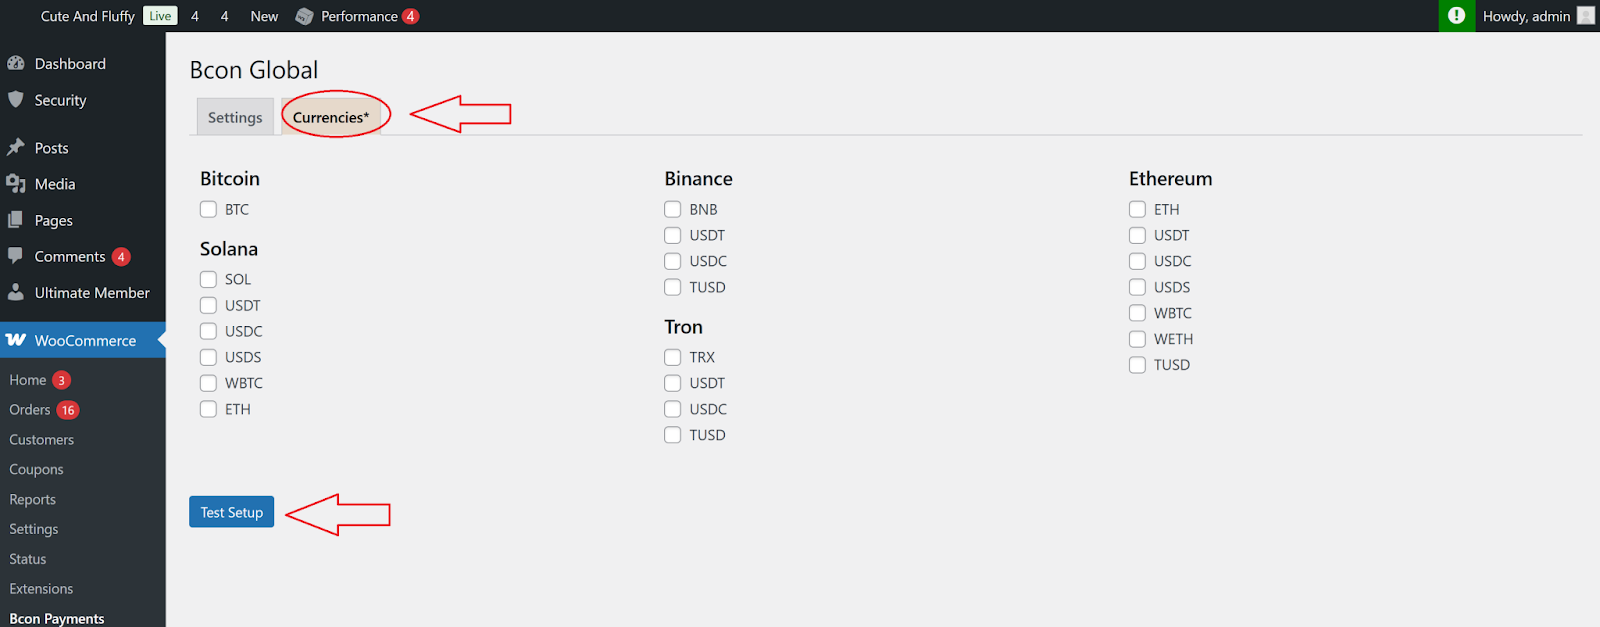
Navigate to the ‘Currencies’ tab and activate the currencies you wish to utilize.
Save all the changes.
Step4. Check which wallets will be displayed during the purchase.
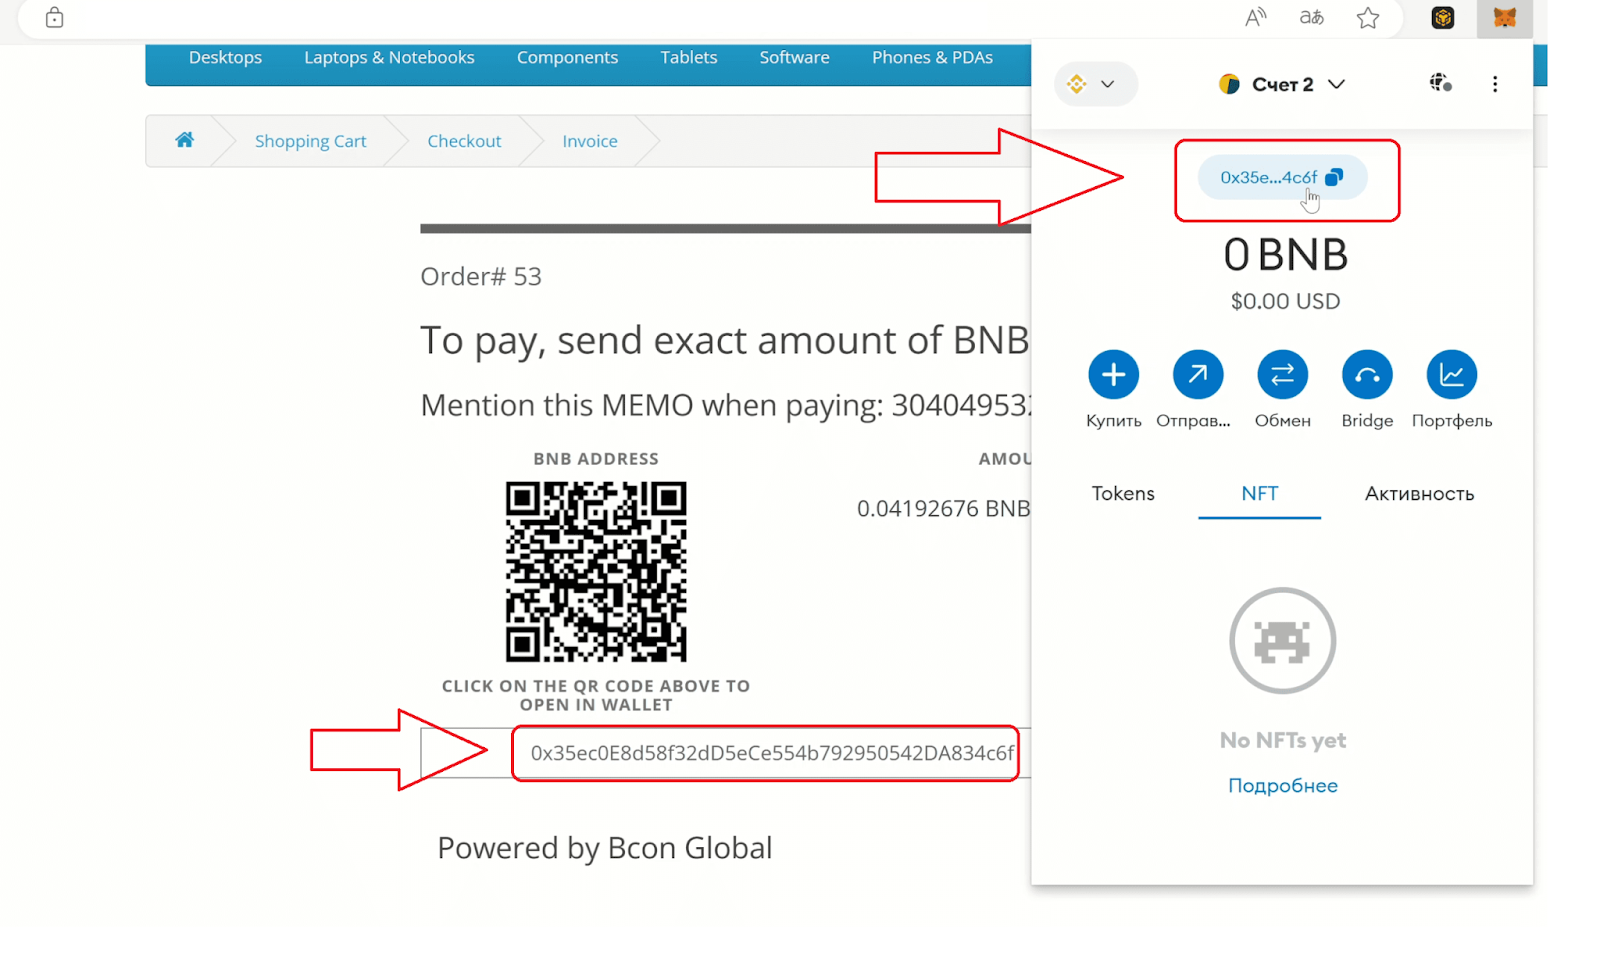
The wallet for this invoice was created using the public key provided during store setup. As a result, users can make direct payments to your wallet. You can now receive cryptocurrency in your wallets without any intermediaries!
How invoice looks like for BTC:

How invoice looks like for BNB:
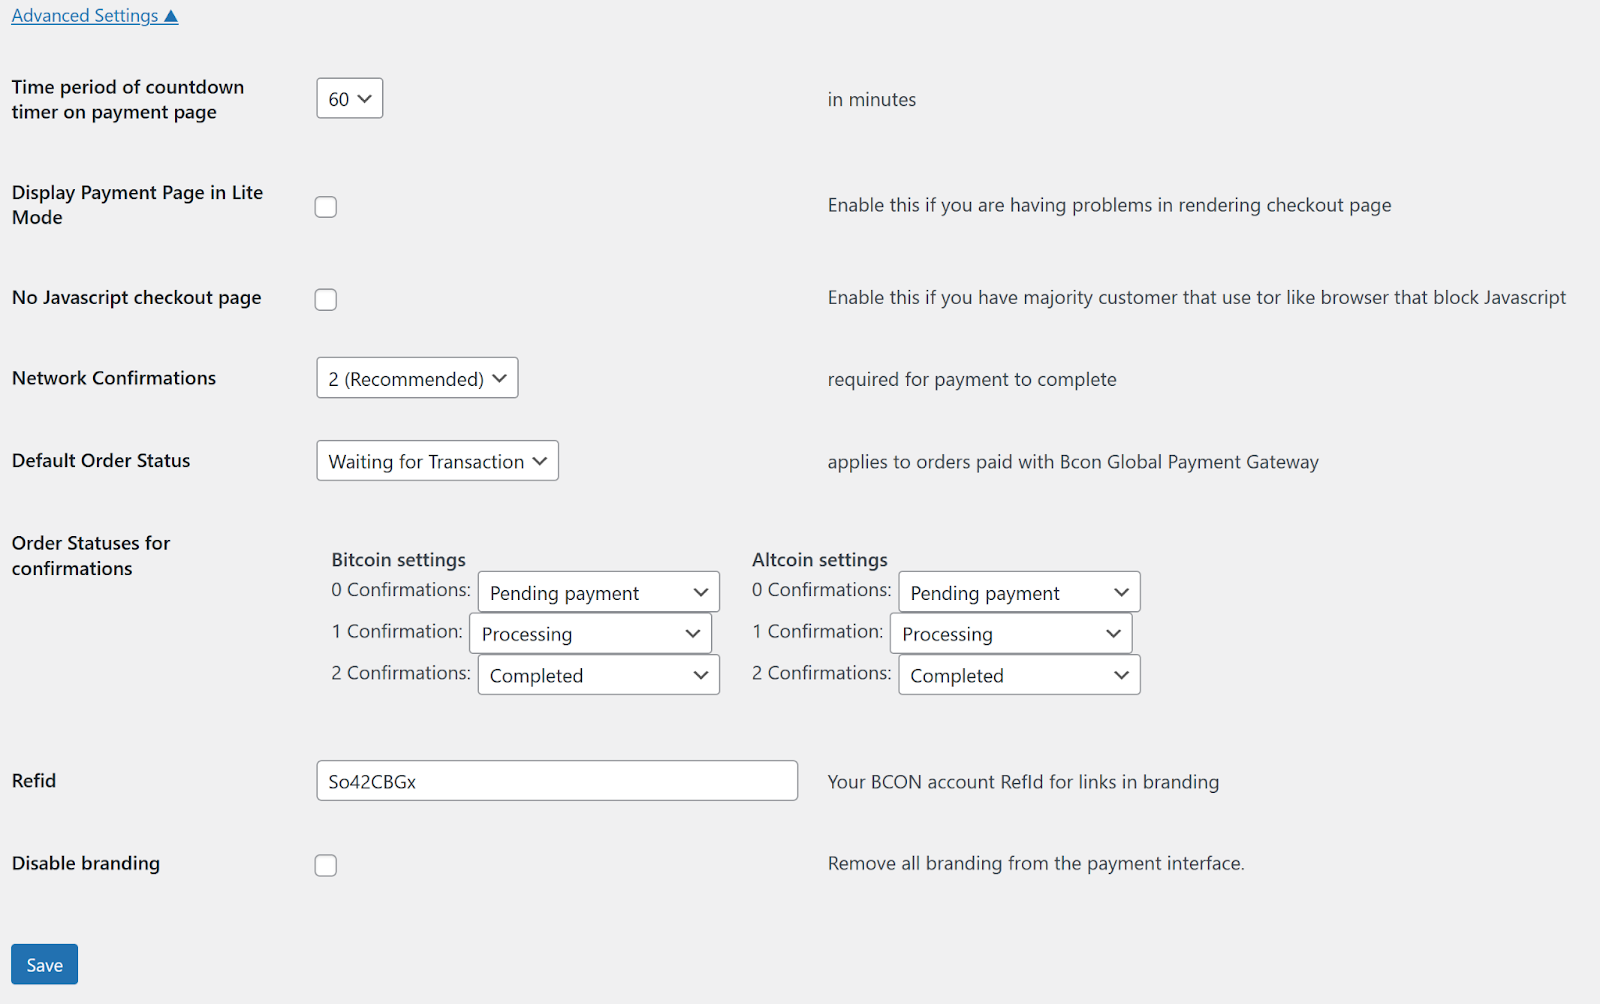
Advanced Settings of the plugin
- Time period of countdown timer on payment page – The invoice’s lifetime, after which it will be marked as expired. Our system will still track the payment for up to 24 hours, and even if the invoice expires, you will see a payment notification in your personal account.
- Display Payment Page in Lite Mode – removes certain interface elements and makes the page as simple as possible for faster display. This is useful if, for example, there is some incompatibility with your theme.
- No Javascript checkout page – Enable this if you have majority customer that use tor like browser that block Javascript
- Network Confirmations – This feature is for receiving Bitcoin payments. Since Bitcoin network confirmations occur every 10 minutes, you can specify separately after how many confirmations to consider a payment in BTC successful and consider the order paid.
- Default Order Status – What order status should be applied by default to orders for which Bcon is selected as the payment method? This option is designed to ensure that status changes after payment do not conflict with the default status. This is because your statuses may be custom.
- Order Statuses for confirmations – It is divided into two sections, one for Bitcoin and one for Altcoins, as Bitcoin confirmations occur every 10 minutes, while Altcoin confirmations occur every few seconds. Let’s say you don’t want the order status to change to “Completed” after successful payment, but want it to remain “Processing”, with Completed being set manually by support after the order has been processed. This is just an example.
- Refid – Your referral ID from your personal account. You need to fill this in if you want to participate in our affiliate program. To do this, branding on the payment page must be enabled (next option).
- Disable branding – Disabled by default (i.e., branding is enabled). Branding includes the Bcon logo and a link under the invoice with your RefId, which will allow you to attract users to our service and participate in the referral program. If you want to remove branding, simply enable this option.
Conclusion
Using the Bcon crypto payment gateway, you can accept bitcoin, ethereum, solana, stablecoins, and other forms of digital currency directly in your WooCommerce store and any online store without relying on a middleman. As a non-custodial cryptocurrency payment gateway, it allows you to accept cryptocurrency while maintaining full control over your crypto wallet and private keys. Expanding your payment options can be further enhanced by accepting cryptocurrency payments on OpenCart, allowing for a seamless shopping experience for your customers. This integration not only attracts a broader audience but also aligns your business with the growing trend of digital currencies. By providing flexible payment solutions, you can increase customer satisfaction and potentially boost your sales.
This payment plugin integrates seamlessly with your WooCommerce online store, providing flexible payment options, real-time payment notifications via API, and customizable order status functions. Merchants can benefit from instant payment processing, including instant payment confirmation for supported networks, and transparent transaction fees, while independently managing volatility, exchange rates, and product price calculations.
Unlike traditional payment processors, Bcon does not work and hold your fiat currency or require mandatory fiat conversion. You decide whether to keep funds in crypto or convert to fiat through your preferred service. There is no forced KYC for simply receiving BTC or ethereum payments, and no third-party custody of funds.
With support for EVM networks, stablecoins, cross-chain functionality, and customizable widget-based crypto checkout pages, Bcon enables businesses to accept crypto payments securely and efficiently. It is a practical solution for companies that want to accept crypto payments, reduce reliance on fiat systems, and implement instant payment solutions in their online store.
If your goal is to accept cryptocurrency with full control, transparent transaction fees, flexible fiat conversion, and modern crypto checkout functionality, Bcon provides a scalable and secure approach for integrating crypto payments into your online store.